Posts

Showing posts with the label Box

How to wire up a Stomp Box Effects Pedal
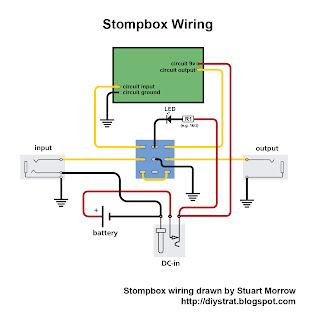
Image
Today we're going to talk about how to wire up a stompbox. Apart from the effects circuit itself, there are three things that have to be thought about when wiring up a stompbox, which are the stomp switch, the stereo input jack and the DC-in connector. I’ll be referring to this image throughout the explanation (as with all images on here, click to enlarge): 1. The Switch To try to make this easy to follow, consider the left-hand column of the switch to be the input column, the middle column to be the LED column, and the right-hand column to be the output column. If for any reason you only have a 6-pin switch, you can still use it, just without the LED column. Off position In the OFF position, pin 4 is connected to pin 7, pin 5 is connected to pin 8, and pin 6 is connected to pin 9 (in my diagram at least – you may have a switch with different numbers written on it, though often they have none at all). Looking at just the left and right columns, the input comes in from the input jac...

Junk box Fan Speed Controller Circuit Diagram

Image
My new home theatre receiver was getting rather hot in the close confines of its cabinet, with the temperature reaching over 40°C after only about 30 minutes of use. To help lower the temperature, I decided to install a fan in the cabinet. A 75mm hole was cut in the shelf under the receiver, and a 12V fan salvaged from an old computer power supply was mounted underneath. The fan was powered from a 12V DC plugpack.  This did the job, keeping the temperature below 30°C even after prolonged use on a warm day. However, the fan was annoyingly loud when running at full speed. To reduce the noise level substantially, I built this fan speed controller with temperature feedback. The circuit was culled from variety of ideas found on various sites on the internet, with the final circuit designed from what was in the "junk box". Air temperature in the cabinet is sensed via an LM335 (TS1). Circuit diagram: Junk-box Fan Speed Controller Circuit Diagram It is glued to a piece of aluminium a...

Simple Mains Box Heat Monitor Circuit Diagram

Image
D. Mohan Kumar is most popular in India for his electronic project, to day i share his project with you. This simple circuit monitors the mains distribution box constantly and sounds an alarm when it senses a high temperature due to overheating, helping to prevent disasters caused by any sparking in the mains box due to short circuits. It also automatically switches on a bright white LED when the power fails. The LED gives ample light to check the mains box wiring or fuses in darkness. The circuit beeps once when power fails and again when power resumes. The AC mains is stepped down by transformer X1 to deliver a secondary output of 9V AC at 500 mA. The transformer output is rectified by diodes D1 through D4. Capacitor C1 bypasses the ripple. LED1 indicates the power-on condition. Resistor R1 acts as the current limiter for LED1. Simple Mains Box Heat Monitor Circuit Diagram Germanium diode D5 (1N34) is the temperature-sensing element, which is connected in the reverse bias mode. At no...

Automotive Ignition Coil Buzz Box

Image
  Automotive Ignition Coil Buzz Box Circuit Diagram :   This picture is a circuit for a buzz coil using a standard car battery to create. Dual timer IC 556 is used to set the frequency and the duty cycle of the coil current to be determined. One of the timer is used as an oscillator for generating the rectangular waveform 200 Hz to control (IRF740 MOSFET), while the second timer is stopped and the oscillator switching points are opened and closed (closed = a). The result is a steady stream of sparks of the ignition coil a distance of about 5 milliseconds, while the switching points are closed. Operation: Pin 8 and 12 the trigger inputs, and a timer which are driven by the points and an inverted signal of the clock output (pin 9) to produce. When the pin 9 is grounded points high, and vice versa. The signal on pin 9 controls the reset line (pin 4) of the second timer and keeps the output at pin 5 is low, while pin 4 and pin 8 is low and 12 high (still open). The 15K and 47K resist...

LED light weight Box

Image
For beginners, it's their 1st project that offers them a lift. And so as to induce that, it's continuously necessary to create positive that the project that you just choose is basically helpful. One such project is that the RGB light-weight fader. this is often quite straightforward and may be done simply by a beginner. scan on to understand a lot of concerning this.  Concerning twenty LEDs are needed here. begin by wiring all the LEDs and connecting it to a breadboard. this is often quite a tedious method and takes quite plenty of your time.  ensuing step is to create the ability board. Quite plenty needs to be done to drive all the LEDs employing a single PWM channel. therefore to atone for this, a multiplexer IC is employed. a couple of voltage conversions is also needed in such a case.  As mentioned earlier, one PWM is employed to regulate 3 totally different channels. The MSP430 is employed to modify between the various channels. this offers the impression that ther...

Cash Box Guard

Image
Most thefts happen after midnight when people enter the second phase of sleep called 'paradoxical sleep.' Here is a smart security circuit for your cash box that thwarts the theft attempt by activating an emergency beeper. The circuit can also be used to trigger any external burglar alarm unit. The cash box guard circuit (shown in Fig. 1) is built around IC CD4060 (IC1), which has an inbuilt oscillator and divider. The basic oscillator is configured by a simple resistor-capacitor (R-C) network. IC CD4060 divides this oscillator frequency into binary divisions, which are available as outputs. In light, reset pin 12 of IC1 remains low, which enables the oscillator built around IC1. However, in the dark, it making all the outputs low. This also stops oscillations of the internal oscillator. Working of the circuit is simple. If the cash box is closed, the interior will be dark. Hence in the dark, the light-dependant resistor (LDR1) resets IC1 and it stops oscillating and counting. ...